Supercharge your pixinsight workflow by enabling GPU Acceleration on Linux
- Arun Soman
- Mar 24, 2023
- 2 min read

PixInsight is a powerful image-processing software used by astrophotographers, researchers, and scientists for analyzing astronomical images. By default, PixInsight runs on the CPU, but it is possible to enable GPU acceleration to speed up the processing time. In this blog post, I will guide you on how to enable GPU acceleration for PixInsight on Linux using CUDA and libtensorflow-gpu.
Step 1: Check if you have a compatible GPU
The first step is to check if you have a compatible GPU. NVIDIA GPUs are the most commonly used for deep learning and image processing tasks. You can check if your GPU is compatible with CUDA by visiting the NVIDIA website and checking the CUDA-enabled GPUs list. If your GPU is not compatible, unfortunately, you cannot enable GPU acceleration for PixInsight.
To check if you have a compatible GPU on Linux, you can use the following command in
This command will list all the NVIDIA GPUs installed in your system. If you don't see any output, it means that you don't have a compatible NVIDIA GPU installed in your system.

Step 2: check the version of cuda-runtime being used by pixinsight
For that fire, the below-given command on the terminal assuming pixinsight is installed using default params

mine is using cuda version 11.0, this means we will have to download cuda-toolkit version 11.0.0
Step 3: Download and install cuda toolkit and cudnn
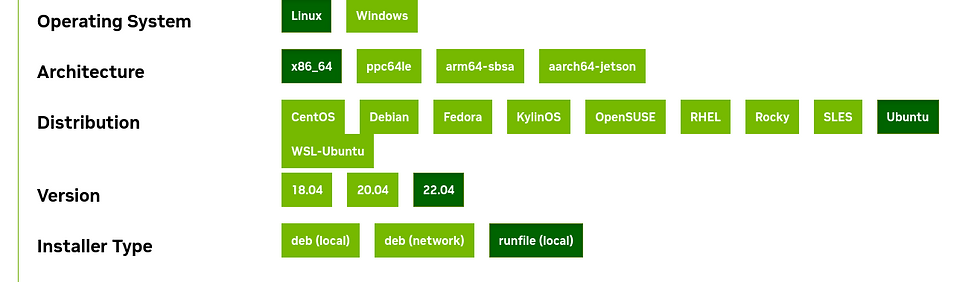
So from step 2 we know which version of cuda is pixinsight is configured but I installed 11.8.0 assuming that there are more bug fixes. Use this link to download

now you will need to know the Operating System, Architecture, Distribution and Version
Installer Type before proceeding any further use the following commands
operating system | uname -o |
Architecture | uname -a |
Distribution | lsb_release -i |
version | lsb_release -r |
I opted for the following
then followed the instruction given below

It may take some time depending on your download bandwidth, its important that you dont install the driver, installing driver may impact your display. I opted the following


This should install cuda in /usr/local/cuda-11.8 use the below-given command so that the operating system knows where to look for when a lib file is asked for
Now extract the cudnn and copy the contents of include and lib folder into corresponding folders in cuda, I did it with the following
Step 4: Install and configure tensorflow
Download and follow the install instructions provided here https://www.tensorflow.org/install/lang_c it is highly recommended to test the installation by running the hello_tf program
Step 5: modify pixinsight installation to accommodate the new cuda and tensorflow
Follow the below-given instructions
Step 6: Test if everything works and is faster
Open a terminal and type PixInsight, this should launch the pixinsight app otherwise it will tell you why it could not

in my case it launched the app but when I executed blurXterminator if fall back to CPU than using the GPU, reason: "failed call to cuInit: CUDA_ERROR_UNKNOWN: unknown error"
but rebooting did the trick, I assume something to do with how gpu is engaged after suspend operation
Here are some data points after cuda is enabled

feel free to comment and I will respond on need bases ;)
clear skies
thanks Arun.. one thing I would like to add..
you need version 2.14.0 which works with CUDA 11.8. (2.12.0 and 2.13.0 also work). I got this info from this table: https://www.tensorflow.org/install/source#gpu
Posts that ask you to go to https://www.tensorflow.org/install/lang_c and select the linux GPU version will result in you downloading version 2.15.0 which will NOT work with CUDA 11.8. I changed the URL to 2.14.0 which is the last version that works with CUDA 11.8.
Now that I have explained this the following URL would work
https://storage.googleapis.com/tensorflow/libtensorflow/libtensorflow-gpu-linux-x86_64-2.14.0.tar.gz
Hi Arun,
Thanks so much for this post. I have not found any other posts on getting PI working with Cuda on Linux. I can confirm that the Cuda, cuDnn, TensorRT and Tensorflow are all installed and confirmed to be working.
I got through the entire process but the last line executed gave me this:
sudo ln -s /usr/local/cuda-11.8/lib64/libcudart.so /opt/PixInsight/bin/lib/
ln: failed to create symbolic link '/opt/PixInsight/bin/lib/libcudart.so': File exists
When I try to update PI with StarExterminator, BlurExterminator or NoiseExterminator the module fails to load and I get this message in the process console:
<* failed *>
*** PixInsight API Error: Module: /opt/PixInsight/bin/NoiseXTerminator-pxm.so
Cannot load library /opt/PixInsight/bin/NoiseXTerminator-pxm.so: (libtensorflow_framework.so.2: cannot open shared object file: No such file or directory): Module load…
Two things: on my stock Kubuntu 23.04 install I also had to add "sudo apt install libcublas
For those that are not s/w developers, testing the tensor install (i.e., "hello_tf.c") also requires "sudo apt install buiild-essentials".
Nice job with this, thanks!